> For the complete documentation index, see [llms.txt](https://docs.intranet.ai/llms.txt). Markdown versions of documentation pages are available by appending `.md` to page URLs; this page is available as [Markdown](https://docs.intranet.ai/sharepoint-intranet/releases/version-1.8.md).
# Version 1.8
Here you can find the changes included in this release.
## Advanced Search
1. Thanks to a new option in the People settings, you can choose to **show the user's Teams status** in the search bar. You just need to activate the **Show presence** option.
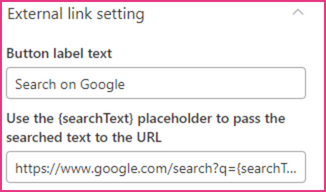
2. A new section has been added to the configuration pane of the web part. This section, named **External links settings**, allows you to add a link to an external source of information. For instance, you can add a button for searching on Google.
To configure this section, you need to take the following steps:
* In the first field, enter the **button label text**, i.e., the text you would like to display on the button (for example: Search on Google)
* In the second field, enter the **URL** you would like to use, followed by the **{searchText} placeholder** (for example: [https://www.google.com/search?q={searchText}](https://www.google.com/search?q={searchText}”))
## Company Apps
The latest version of this component includes a new option which allows you to **activate the tab mode**. If you enable this option, **the user will open the apps area by clicking on a small button**. To configure the tab mode, follow these steps:
* Enter the **name of the icon** that will be used for the button. You can choose an icon from the library at [this link](https://developer.microsoft.com/en-us/fluentui#/styles/web/icons) and then copy-paste the name of the icon into this field.
* Define the position of the button on the page by entering the **top margin** and the **right margin**.
* Finally, choose the **height of the apps section**.

## Event Calendar
Now, in the Layout settings, you can choose from **three layouts**: the new layout is called **Compact with details**. It basically consists of a compact calendar with details displayed on the left. The details section includes the date, the title and the description of the event. You can use the arrows in the lower left corner of the web part to browse events.
## Job Posting
It is now possible to **choose the number of job offers to load**. For example, if you enter number 10, at first the page will display ten offers; when you click on the Load more button, ten more offers will be shown. By entering an unrealistically high number (e.g., 999), all the offers will be shown.
## My Profile
Now, thanks to the **Show presence** option, you can choose to **show the person's Teams status**, which will appear next to his or her name.
## People Directory
The current version of this component also includes the **Show presence** option, which allows you to **show the user's Teams status** in his or her card. To activate this option, you just need to select **Yes**.